Activity 2: Write a Simple “Hello!” Sketch
To get started using Arduino Web Editor instead of the Arduino IDE, click here.
To get started using Codebender instead of the Arduino IDE, click here.
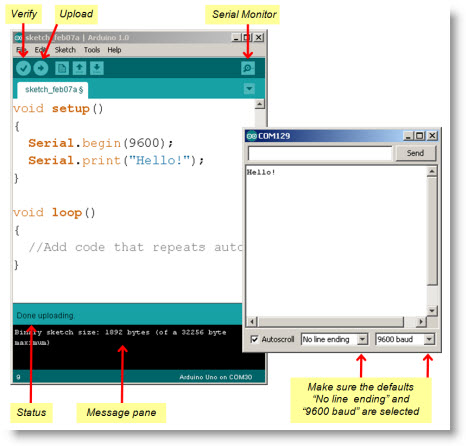
Here is a screen capture of the Arduino Development Environment edit pane on the left, containing a simple sketch that sends a “Hello!” message to the Serial Monitor window on the right.
- Open your Arduino software and carefully type in the code:
void setup()

{
  Serial.begin(9600);
  Serial.print("Hello!");
}

void loop()
{
  //Add code that repeats automatically here.
}
- Be sure you have capitalized “Serial” both times, or the sketch won’t work.
- Also, notice in the figure that the sketch uses parentheses() and curly braces {}. Be sure to use the right ones in the right places!

- Click the Verify button to make sure your code doesn’t have any typing errors.
- Look for the “Binary sketch size” text in the message pane.
- If it’s there, your code compiled and is ready to upload to the Arduino.
- If there’s a list of errors instead, it’s trying to tell you it can’t compile your code. So, find the typing mistake and fix it!
- Click the Upload button. The status line under your code will display “Compiling sketch…,” “Uploading…,” and then “Done uploading.”
- After the sketch is done uploading, click the Serial Monitor button.
- If the Hello message doesn’t display as soon as the Serial Monitor window opens, check for the “9600 baud” setting in the lower right corner of the monitor.
- Use File → Save to save your sketch. Give it the name HelloMessage.
Now you are ready to see How the Hello Sketch Code Works.
