IR Receiver and Remote
An IR receiver can detect bursts of infrared light sent by a common remote controller (like for a television), and then output a pattern of high/low signals to a Propeller I/O pin. This quick tutorial will first show you how to wire up the infrared receiver. Then, you will run a test program that will display the number for the remote button pressed in the Serial Terminal.
Activities with an infrared receiver are sensitive to interference from other light sources, including sunlight and fluorescent light fixtures.
Circuit
The infrared receiver needs three connections: 5 V, GND, and an I/O pin to read the signal it sends. The circuitry inside the infrared receiver makes it safe to connect its signal pin to the Propeller I/O pin with a small resistor, even though the sensor is powered by 5 V.

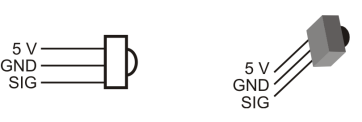
Parts
- (1) Infrared receiver (#350-00014)
- (1) 220 ohm resistor (red-red-brown) (#150-02210)
- (1) Sony-programmable Universal Remote (#020-00001) with batteries
- Jumper wires
- Build the IR receiver circuit on the Activity Board (original or WX version) breadboard.
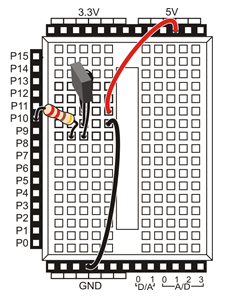
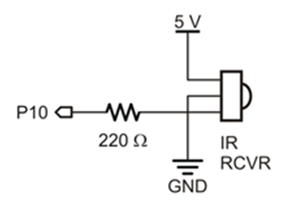
You can use the schematic with any Propeller board that has a prototyping area.
Test Code
The test program decodes signals received from a SONY remote. In the SimpleIDE terminal, it displays the value of whichever button you press on the remote.
- If you haven’t already installed the latest USB driver, SimpleIDE, or Learn folder, go to Propeller C – Set up SimpleIDE and Propeller C – Start Simple.
- Configure your remote for Sony protocol, following its manufacturer instructions. (If you purchased the Brightstar brand remote from Parallax, hold the Setup button until the light near it comes on. Enter 6-0-5 and the light should go off. Done!)
- Open Test SIRC Remote.side from …DocumentsSimpleIDELearnExamplesDevicesTV Remote.
- Click the Run with Terminal button (F8).
- Point the remote at the IR receiver, and push some buttons.
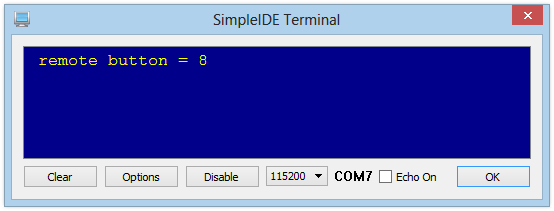
You should see the remote button number displayed in the SimpleIDE terminal. Note that the Channel up/down, Volume up/down, and Mute buttons also return numbers.
How it Works
The IR receiver is looking for infrared light (in the 980 nanometer range) that is pulsing at around 38 kHz. The IR remote sends short bursts of 38 kHz infrared light, in a different on-off pattern for each button on the remote. While the IR receiver detects these bursts it sends a 0 the Propeller I/O pin, and a 1 when it does not. The sirc library does the work of decoding the on-off pattern detected by the I/O pin. The name “sirc” stands for SONY Infrared Remote Code, since it decodes signals that use the SONY remote protocol. This is why you must use a remote that is set up to control SONY devices.
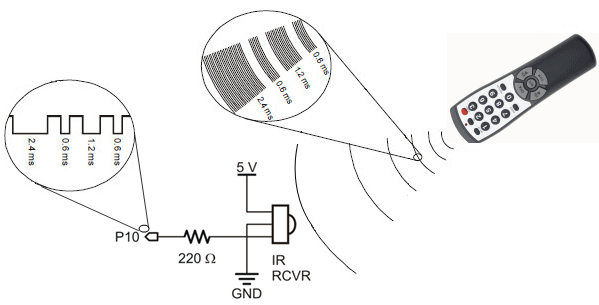
The test program very short. It calls two functions from the sirc library: sirc_setTimeout (int ms) and sirc_button(int pin).
The function sirc_button sets the specificed I/O pin to input, decodes any incoming infrared signal detected, and returns a value matching to the IR remote button that was pressed. If there is no value returned within the number of milliseconds set by the sirc_setTimeout function, sirc_button will return a -1.
Inside the while(1) loop, a single print statement contains the call to sirc_button, and displays the return value in the Serial Terminal. Each time through the loop, the HOME formatter moves the cursor to the upper left corner of the SimpleIDE terminal, and the CLREOL (clear to end of line) formatter refreshes the printed string with the most recent value returned by sirc_button. The loop repeats about 10 times per second, since pause(100) introduces a 100 ms delay each time through.
/*
  Test SIRC Remote.c

  Connect 38 kHz IR receiver to Propeller P10
  Decodes button presses on Sony-compatible IR remote
  Run with Terminal

*/

#include "simpletools.h"                      // Libraries included
#include "sirc.h"

int main()                                    // main function
{
  sirc_setTimeout(1000);                      // -1 if no remote code in 1 s

  while(1)                                    // Repeat indefinitely
  {
                                              //  decoding signal from P10
    print("%c remote button = %d%c",          //  Display button # decoded
          HOME, sirc_button(10), CLREOL);     //  from signal on P10

    pause(100);                               // 1/10 s before loop repeat
  }
}
Did You Know?
Interference call! Infrared receivers are sensitive to interference from other light sources, including direct sunlight. Some fluorescent light fixtures can emit 38 kHz infrared light as well. Want to test your light fixtures? See the Your Turn section below for tips on making an Interference Detector.
Try This
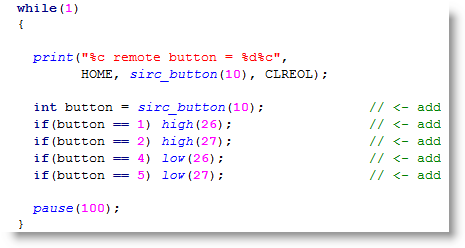
If you are doing this tutorial, you probably want the IR remote to make your project do something. So, let’s make the IR remote control the LEDs on the Activity Board (original or WX version). First, you will need to add a local variable, and set it equal to the number returned by the sirc_button function call. Then, add a series of if(button… statements that turn the Activity Board’s built-in LEDs on and off, depending on which remote button is pressed.
- Use the Save Project As button to save a copy of your project in …DocumentsSimpleIDEMy Projects.
- Add the five lines of code shown below to the while loop.
- Click Run with Terminal again.
- Try using the IR remote’s 1, 2, 4, and 5 keys to turn the board’s LEDs on and off.
Your Turn
- Make an IR Interference Detector.
For this, use an if…else if statement that turns on just the P26 LED if the button variable is not equal to (!=) -1, and otherwise turns the LED off. You can use any button on the IR remote to test if it is working — any button should turn on the LED. Then, if you load your program to EEPROM and use an external power supply, you can have a mobile IR Interference Tester. This can be useful scope out different places you might want to use your IR remote controlled inventions.
