This project will show you how to build a 4-note musical instrument where you use tilt, rather than buttons or keys, to control the notes you play. A different LED will light up when each note plays. You can build this project on the Propeller Activity Board’s prototyping area or Propeller FLiP Try-it Kit’s breadboard. If you are using the FLiP Kit, add extra features to your project on the open breadboard space.
Propeller I/O Pin Assignments
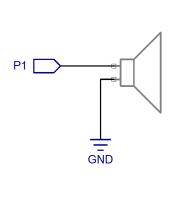
- P1 – Piezo Speaker
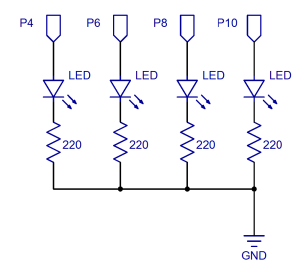
- P4, P 6, P8, P10 – LEDs
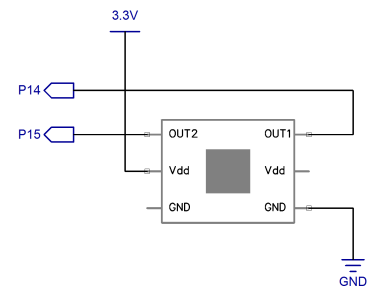
- P14-P15 – 4-Directional Tilt Sensor
Build It
- Disconnect/turn off the power to your board (always prudent when building or modifying circuits).
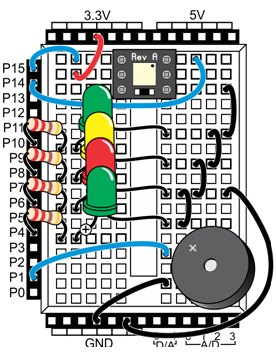
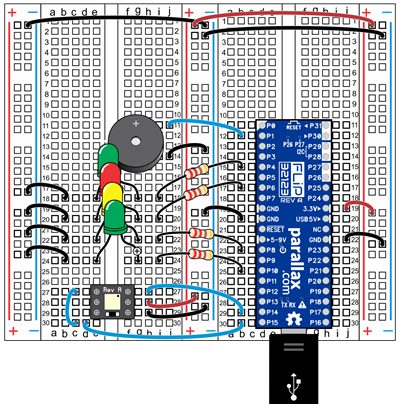
- Use the schematics below to build the circuits on your board. Use the wiring diagrams for reference.
Power your Project
The sensor, LEDs, and piezo speaker use very little current. It is fine to power this project via the boards’ USB cable only.
- Connect your board to your computer for programming.
- (1) Propeller development board option:
- (4) Any combination of LED colors
- (1) Piezo Speaker (# 900-00001)
- (1) 4-Directional Tilt Sensor (#28036)
- (4) 220 Ohm resistors
- (10) Jumper wires
Propeller I/O Pin Assignments
- P1 – Piezo Speaker
- P4, P 6, P8, P10 – LEDs
- P14-P15 – 4-Directional Tilt Sensor
Build It
- Disconnect/turn off the power to your board (always prudent when building or modifying circuits).
- Use the schematics below to build the circuits on your board. Use the wiring diagrams for reference.


Power your Project
The sensor, LEDs, and piezo speaker use very little current. It is fine to power this project via the boards’ USB cable only.
- Connect your board to your computer for programming.
- P1 – Piezo Speaker
- P4, P 6, P8, P10 – LEDs
- P14-P15 – 4-Directional Tilt Sensor
Build It
- Disconnect/turn off the power to your board (always prudent when building or modifying circuits).
- Use the schematics below to build the circuits on your board. Use the wiring diagrams for reference.


Power your Project
The sensor, LEDs, and piezo speaker use very little current. It is fine to power this project via the boards’ USB cable only.
- Connect your board to your computer for programming.
